


I recently decided to start working on a small side project, whereby I wanted to automate the deployment so that I can write code without having to think about how and when I’ll deploy the changes.
Being that I didn’t want to spend much on hosting I decided that I would host the instances on Linode (additionally they have a Sydney datacenter).
\* Note: this tutorial will also work with private dockerhub repositories!*
Before we get started started
In order to follow along with this tutorial, it’d be worth creating accounts with the following services/platforms:
Github account — the reason is because this tutorial is focused around github actions.
Docker hub account — this will be used to host your docker repository.
At the time of writing they have 1 free private repository.Linode account — this will be where we host our kubernetes cluster.
You could very easily use another cloud provider if you wished such as Digital ocean.
Create a Kubernetes Cluster
We’ll start off by creating out Kubernetes cluster in Linode as it can take some time for it to provision.
To do this we’ll click the “Create” button at the top of the screen, and then select Kubernetes.
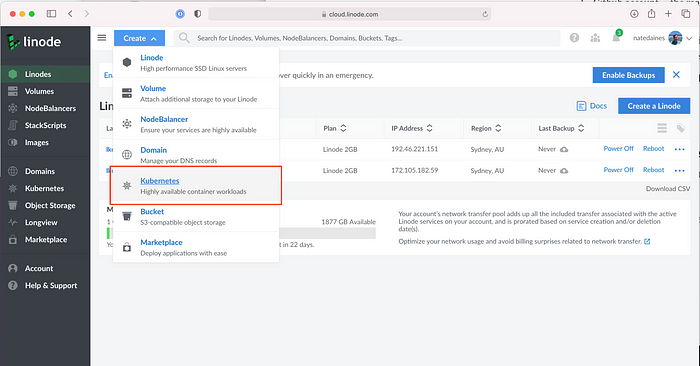
Create a new Kubernetes cluster by selecting “Create” from header then “Kubernetes”
Then we’ll give our cluster:
a name — it cannot contain special characters, spaces or underscores.
a region — this can be anything; I’d suggest finding a region with the least amount of latency.
a kubernetes version — I simply chose the newest version
a node — since we are getting started, I just added 1x Linode 2GB to keep costs at a minimum. In production you’d obviously want more nodes in your cluster.
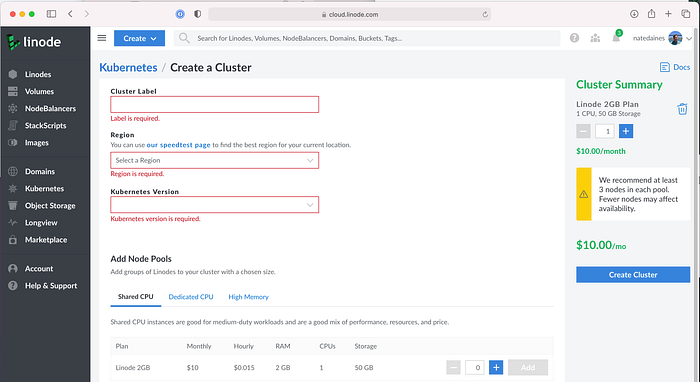
Kubernetes cluster creation dialog
Once we click “Create Cluster”, Linode will create our Kubernetes cluster — this will take some time to provision so we can move on with the rest of our deployment.
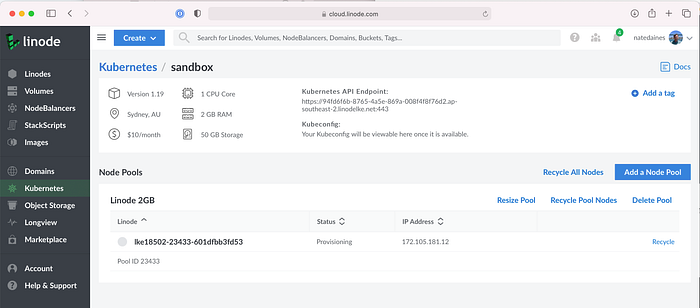
Kubernetes cluster page, currently provisioning the cluster
Creating a git repository
I created an empty git repository in Github for this tutorial however you could add this to an existing Github repository.
You can reference what I do in the following git repository:
https://github.com/nmcdaines/linode-kubernetes
Adding “Secrets” to the github project
Next we will add the required secrets for the github actions to the repository; that way we can set and forget.
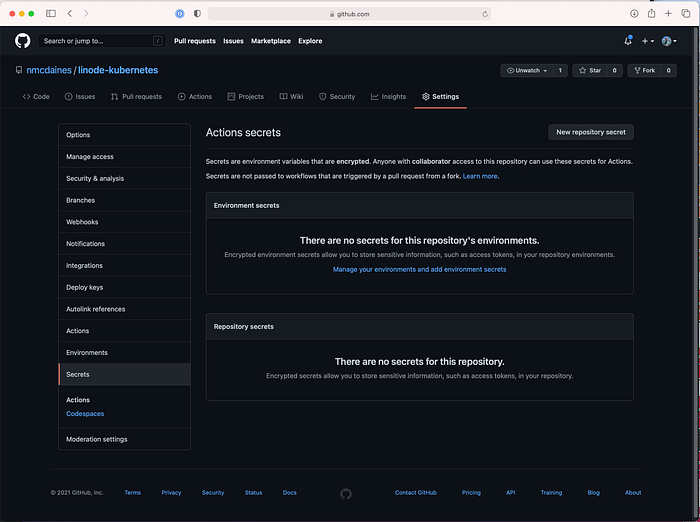
Empty repository secrets page
The secrets that we will need to collect are as follows:
DOCKERHUB_USERNAME —
This will be the username that you created when signing up to dockerhubDOCKERHUB_TOKEN —
This will be a secure token generated for your account; means you don’t need to enter your dockerhub passwordDOCKERHUB_REPOSITORY —
This will be the repository name in dockerhub; if you’re not creating a private repository then you can probably reuse the name of your github repositoryKUBE_CONFIG —
The kubernetes config that is downloaded from Linode kubernetes cluster portal
** Note: the secrets key is case sensitive.
Getting our Dockerhub credentials
Once you have created a dockerhub account, you will need to go to the account settings.
Alternatively you can goto the following url: https://hub.docker.com/settings/security
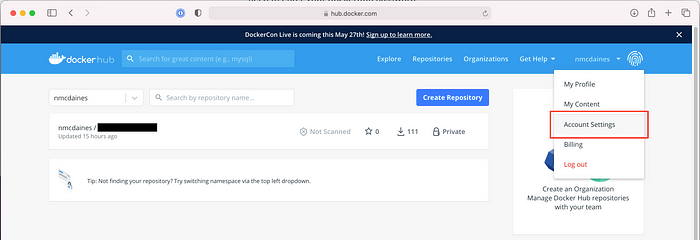
Dockerhub home screen
Once you have arrived at the account settings page you will need to select the “Security” tab.
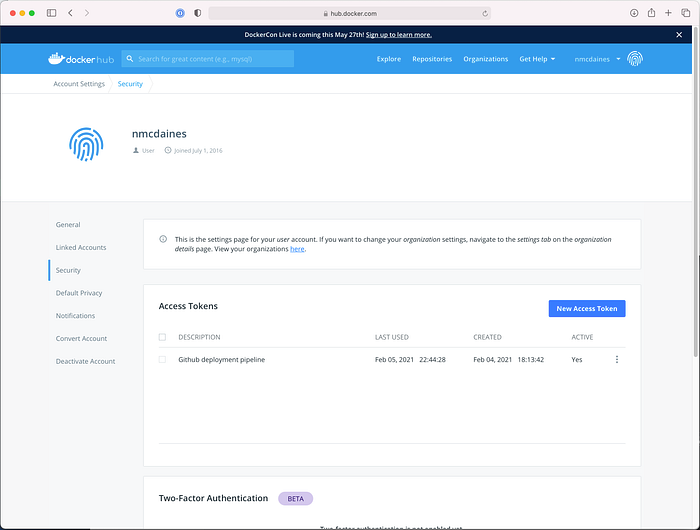
Dockerhub settings page where we can create a new access token
Then we can select “New Access Token” whereby you will be asked to enter a description for your access token.
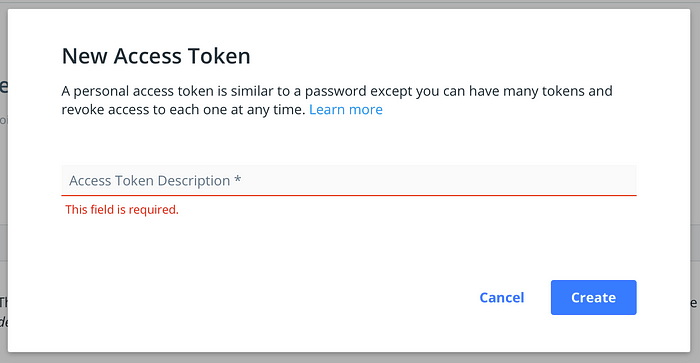
Dockerhub new access token dialog
Once done click “Create” then another dialog will appear with your access token.
Be sure to save this in a safe place as you won’t be able to access this again; and we’ll need it a little later in this tutorial.
Once you have your username and token; add then to the github secrets page for your repository as:
DOCKERHUB_USERNAME
DOCKERHUB_TOKEN
Whilst your at it, if you haven’t set the DOCKERHUB_REPOSITORY then set that now as your git repository name.
Getting the Kube Config
Next open the Kubernetes cluster page in Linode, now that the service has provisioned; it should look something like the following:
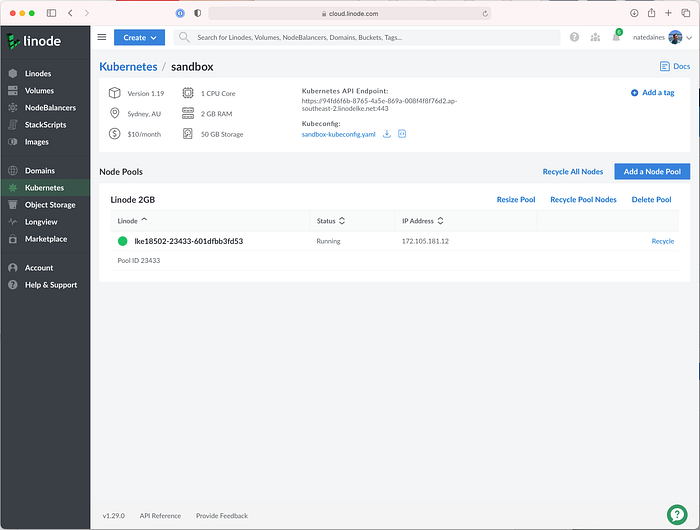
Linode kubernetes cluster page
Where it says “Kube config” we want to click the icon with “<>” this will then open an overlay with the Kubeconfig.

Linode kubernetes cluster information showing how to view kubeconfig
We then cant to copy the configuration from Kubernetes and add that to the github repository settings under the key “KUBE_CONFIG”.
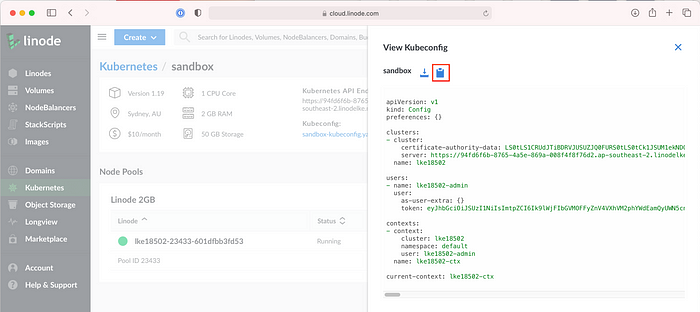
Linode kubernetes cluster page showing kubeconfig
** Note: it would be worth downloading the kubeconfig as well in order to connect to the Kubernetes cluster from kubectl on your local computer.
Setting up the app
I’ve decided to use NodeJS for this tutorial; however you could use any language so long as you have an appropriate Dockerfile.
For simplicity; I am going to take the basis for the NodeJS app and Dockerfile from the tutorial linked as follows. If you want to read more on setting up a Dockerfile for nodejs I’d suggest reading that tutorial.
https://nodejs.org/en/docs/guides/nodejs-docker-webapp/
Create a .gitignore
Lets create a .gitignore file in the root of the project so that we don’t add things like our node_modules to the repository.
/node_modules# Logs
npm-debug.log# OS
.DS_Store# IDE - VSCode
.vscode/*
!.vscode/settings.json
!.vscode/tasks.json
!.vscode/launch.json
!.vscode/extensions.json
Create a package.json
In the root of your repository, create a file called package.json
{
  "name": "docker_web_app",
  "version": "1.0.0",
  "description": "Node.js on Docker",
  "author": "First Last <first.last@example.com>",
  "main": "server.js",
  "scripts": {
    "start": "node server.js"
  },
  "dependencies": {
    "express": "^4.16.1"
  }
}
Create a server.js file
Normally you’d create a folder called src and then put the code underneath that; however for simplicity sake we create a server.js file in the root directory.
'use strict';const express = require('express');// Constants
const PORT = 3000;
const HOST = '0.0.0.0';// App
const app = express();
app.get('/', (req, res) => {
  res.send('Hello World');
});app.listen(PORT, HOST);
console.log(`Running on http://${HOST}:${PORT}`);
Create a Dockerfile
Next we’ll create a Dockerfile, this will be used to describe how the container will be created in Kubernetes.
FROM node:14-alpine

# Create app directory
WORKDIR /usr/src/app

# Install app dependencies
# A wildcard is used to ensure both package.json AND package-lock.json are copied
# where available (npm@5+)
COPY package*.json ./

RUN npm install
# If you are building your code for production
# RUN npm ci --only=production

# Bundle app source
COPY . .

EXPOSE 3000
CMD [ "node", "server.js" ]
Create a .dockerignore file
The .dockerignore file will be used to prevent files from your local filesystem from being injected into the docker image. This is important as the container may be using a different opperating system or architecture.
node_modules
npm-debug.log
Install and setup Kubectl
Depending on your operating system, there are a variety of ways to install kubectl.
Install and Set Up kubectl
The Kubernetes command-line tool, kubectl, allows you to run commands against Kubernetes clusters. You can use kubectl…
If you are using macOS, the easist way if to install it by using homebrew
brew install kubectl
Adding Kubeconfig to Kubectl
Kubectl need to be aware of your Kubernetes cluseter and know how to authenticate with it.
There are 2 options that you have outlined in the following article:
Configure Access to Multiple Clusters
This page shows how to configure access to multiple clusters by using configuration files. After your clusters, users…
The easiest way is for you to create an env variable that references your Kubernetes config.
export KUBECONFIG="~/Downloads/config.yaml"
Creating the Kubernetes manifest file for your project
Next we will create a file that contains the Kubernetes manifest; this will the Kubernetes orchestrator how to configure the environment.
We will create a file called k8s.yaml you can call it whatever you like; so long as you update the references we create to this file in the github actions section.
# This section will create a secret in the Kubernetes cluster.
# We need this for private docker repos.
apiVersion: v1
kind: Secret
metadata:
  name: regcred
data:
  .dockerconfigjson: DOCKER_CONFIG
type: kubernetes.io/dockerconfigjson---# This section will create a deployment in the Kubernetes cluster
apiVersion: apps/v1
kind: Deployment
metadata:
  name: linode-deploy
  labels:
    app: linode-app
spec:
  selector:
    matchLabels:
      app: linode-app
  replicas: 1
  strategy:
    type: RollingUpdate
    rollingUpdate:
      maxSurge: 1
      maxUnavailable: 0
  template:
    metadata:
      labels:
        app: linode-app
    spec:
      containers:
      - name: linode-app
        image: DOCKERHUB_USERNAME/DOCKERHUB_REPOSITORY:IMAGE_LABEL
        imagePullPolicy: Always
        ports:
        - containerPort: 3000
      imagePullSecrets:
      - name: regcred---# This section will create a service in the Kubernetes cluster
# so that the deployment can be accessed from the outside
apiVersion: v1
kind: Service
metadata:
  name: linode-service
  labels:
    app: linode-app
spec:
  type: LoadBalancer
  selector:
    app: linode-app
  ports:
    - protocol: TCP
      name: http
      port: 80
      targetPort: 3000
** Note: you can change the occurrences in this document from “linode” to something that better reflects your project
Create the Kubernetes namespace for your app
Before we create the github action that will trigger the orchestration of our kubernetes cluster; we will need to create the kubernetes namespace for our app.
Because I’ve named the app linode-app in my kubernetes manifest (k8s.yaml) i’d run the following command.
kubectl create ns linode-app
Before creating the github action
Before we move on, it’s important that we commit all our code as the action will try running once we’ve created it (and it’d be nice for it to succeed the first time).
Creating a github action
There are 2 different ways for us to create a github action; the easiest to begin with is to:
Click the “Actions” tab on the repository
Click the “set up a workflow yourself →” link
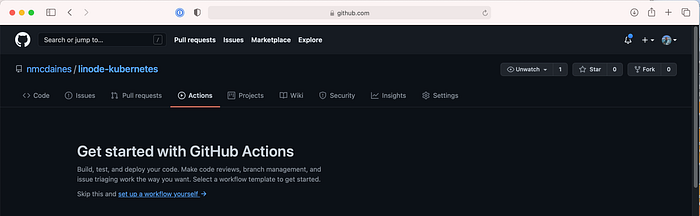
A repos github actions page when no action present
We should then see the following screen with a sample Github action; we want to select all the code and then replace it with the code block to follow.
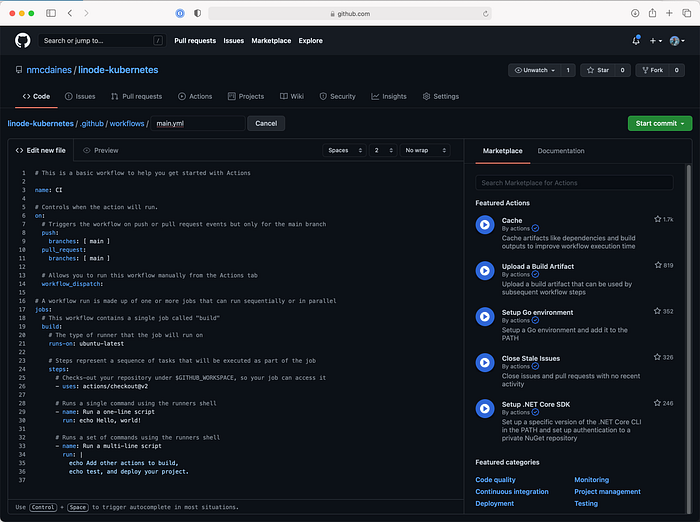
Github page for creating a new action
name: Build and deploy Node.js app to linodeon:
  push:
    branches:
      - main
  workflow_dispatch:jobs:
  build-and-deploy:
    runs-on: ubuntu-latest    steps:
      - name: checkout
        uses: actions/checkout@v2      - name: login to dockerhub
        uses: docker/login-action@v1
        with:
          username: ${{ secrets.DOCKERHUB_USERNAME }}
          password: ${{ secrets.DOCKERHUB_TOKEN }}      - name: Kubernetes set context
        uses: Azure/k8s-set-context@v1
        with:
          method: kubeconfig
          kubeconfig: ${{ secrets.KUBE_CONFIG }}      - name: Docker Build and Push, Kubernetes apply
        run: |
          docker build --tag ${{ secrets.DOCKERHUB_USERNAME }}/${{ secrets.DOCKERHUB_REPOSITORY }}:${{ github.sha }} .
          docker push ${{ secrets.DOCKERHUB_USERNAME }}/${{ secrets.DOCKERHUB_REPOSITORY }}:${{ github.sha }}          export DOCKER_CONFIG=$(cat ~/.docker/config.json | base64 -w 0)          sed -i'' -e 's/DOCKERHUB_USERNAME/${{ secrets.DOCKERHUB_USERNAME }}/g' -e 's/DOCKERHUB_REPOSITORY/${{ secrets.DOCKERHUB_REPOSITORY }}/g' -e 's/IMAGE_LABEL/${{ github.sha }}/g' -e "s/DOCKER_CONFIG/$DOCKER_CONFIG/g" k8s.yaml          kubectl apply -f k8s.yaml
Finally click “Start commit” and follow the prompts.
Your newly created action should then run; and all going well it should be successful and show green.
** Note: if it doesn’t run successfully; just click into the workflow run and see where it failed and debug. My first run failed due to a typo :)
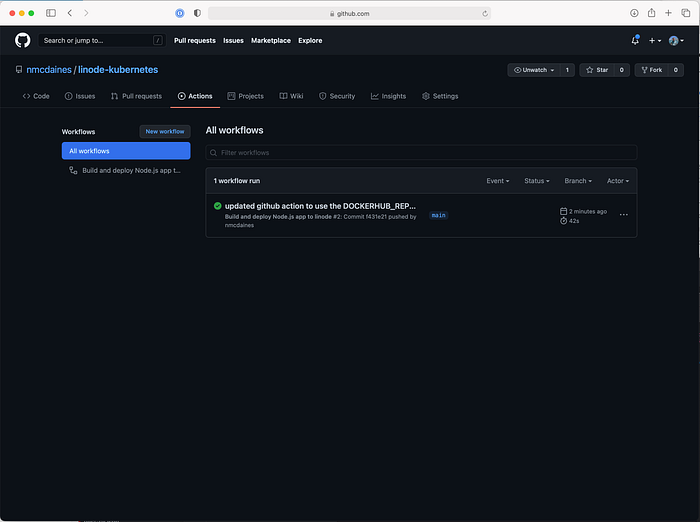
Github actions page showing successfully run workflow
If everything has deployed successfully, you should see a newly created “NodeBalancer” with your nodes in the “up” status.

Linode NodeBalancers page
If you go to the public ip address (available in the above screen) of the “NodeBalancer” in your browser, you should see a page that says “Hello World”.
Webpage showing successful response “Hello World”
And your done!…
You’ve made it to the end! If you want to see more content like this then please follow me.
Regards,
Nate